CSA Blog
Ian Wu
23 Aug 2023
•
DevOps
•
JavaScript
GitHub Pages Coding Introduction
Building the entire frontend GitHub Pages web application requires knowledge of HTML, CSS, and JavaScript. GitHub Pages has built-in support for an additional content language called Markdown, which is a shorthand complement to HTML. Markdown is focused on creating static content.
- HTML is responsible for the content
- Markdown is a shorthand way of writing content
- CSS adds styling to the web page content
- JavaScript adds functionality and interactivity
In GitHub Pages, Jekyll serves as the build framework. It takes our choice of theme specified in the _config.yml file, along with our Markdown, HTML, and notebook files, to construct a complete static website. A significant portion of the frontend design work has already been done for users through the selection and use of a theme; this greatly reduces the need to code in CSS.
Jekyll converts Markdown (.md) files into HTML. Behind the scenes of GitHub Pages, Jekyll and the Liquid programming language build and programmatically construct each Markdown file into a specific web page. Markdown provides a straightforward way to start with GitHub Pages development. In a Markdown file, you can exclusively use Markdown syntax or incorporate HTML, CSS, and JavaScript based on your expertise and experience.
What is Static Content?
Static content refers to web pages that are delivered to the user’s browser exactly as stored, without any server-side processing or dynamic content generation. This means the content remains the same for every user and does not change unless the source files are manually updated. Static websites are typically faster, more secure, and easier to deploy compared to dynamic websites, which require server-side processing to generate content on-the-fly.
Adding Dynamics to GitHub Pages
Through the use of JavaScript and the fetch of data through APIs (backed by servers), developers are able to customize GitHub Pages to support data change. As we explore the portfolio_2025, we will see JavaScript games, login systems, and data that appear very dynamic.
Nighthawk Pages
While this introduction covers the basics of creating static content with GitHub Pages, our classroom GitHub Pages will delve deeper into more advanced topics. We will explore how to integrate dynamic content, use advanced JavaScript techniques, and leverage APIs to create more interactive and engaging web pages.
Markdown to HTML
This notebook will describe and show code fragments to help get the student developer ready for coding and committing changes to GitHub.
All the documents we have been discussing to this point in time were primarily written as ipynb documents that were converted to md. Each md file is converted to an html file.
Since HTML, CSS, and JavaScript are the only files understood by the common web browsers, you will see the _site directory being constructed and updated every time we run make. Those primary browser files and content (ie images) are the only file types that end up in the site directory.
GitHub Pages index.md
In GitHub Pages you can define code in Markdown. The index.md uses markdown to define a page about CompSci courses at Del Norte High School. This pages is entirely markdoown and contains static references to images, that are in the images directory.
Markdown fragment.
Here is a small markdown fragment that was a part of the index.md at one time.
```markdown
## Build your Home Page here
# Investing in your Technical Future
> Explore the Computer Science Pathway at Del Norte High School and invest in your technical skills. All Del Norte CompSci classes are designed to provide a real-world development experience. Class time includes tech talks (lectures), peer collaboration, communication with teachers, critical thinking while coding, and creativity in projects. Grading is focused on time invested, participation with peers, and engagement in learning.
- Introduction to concepts and requirements by the teacher
- Project-based learning with teacher support
- Peer communication and collaboration
- Coding, developer operations, and critical thinking
- Creativity, research, and utilizing ChatGPT
- Class work with approximately 2-3 hours of homework per week

``` ### HTML conversion. This HTML **conversion** of the Markdown fragment. This is produced by GitHub Pages using Jekyll, by running the make command. This is the process of programmatically converting a Markdown to HTML. You can find all the converted md to html files in the _site directory, they get updated each time you type make.
```html
<div class="language-markdown highlighter-rouge"><div class="highlight"><pre class="highlight"><code>
## Build your Home Page here
# Investing in your Technical Future
<span class="gt"> > Explore the Computer Science Pathway at Del Norte High School and invest in your technical skills. All Del Norte CompSci classes are designed to provide a real-world development experience. Class time includes tech talks (lectures), peer collaboration, communication with teachers, critical thinking while coding, and creativity in projects. Grading is focused on time invested, participation with peers, and engagement in learning.</span>
<span class="p"> -</span> Introduction to concepts and requirements by the teacher
<span class="p"> -</span> Project-based learning with teacher support
<span class="p"> -</span> Peer communication and collaboration
<span class="p"> -</span> Coding, developer operations, and critical thinking
<span class="p"> -</span> Creativity, research, and utilizing ChatGPT
<span class="p"> -</span> Class work with approximately 2-3 hours of homework per week
!<span class="p">[</span><span class="nv">csse</span><span class="p">](</span><span class="sx">/teacher/images/ccr.png</span><span class="p">)</span>
</code></pre></div>
</div>
```
Images
In GitHub Pages, you can insert images in HTML or Markdown.
There are many image examples using markdown in the index.md file, this are reading content from the images directory.
The Teacher finds the HTML <img> easier to work with for embedding links when it is necessary to control size. This example shows Markdown syntax for embedding images, but students can also use HTML syntax with the ![]() tag.
tag.
Becoming a Web Developer
Let’s say we wanted to share the key languages we are studying in a blog article about tools and equipment. Notice that the only the first image is in this example and it is kind of big. So, I abandoned this idea. But there is code commented out in this cell that is starting to look better. Perhaps you want to give it a try.
- HTML - HyperText Markup Language 5 officially introduced in 2014
- CSS - Cascading Style Sheets is somewhere between CSS2.1 in 2011 and CSS3 today
- JavaScript - Programming language for web development, ES11 introduced in 2020
- Markdown - Started in 2004. There is a flavor called GitHub flavored Markdown (GFM)

Living in the World
Let’s say someone in CompSci wants to share places they have lived on their index.md page. Notice the size and orientation is a 1x4 grid through CSS.
Tag rules for GitHub Pages
As we code and use chat bots to assist, we need to know certain Tag rules for code in GitHub pages. Remember these as otherwise you may run into unpredictable issues.
-
Not necessary tags. GitHub Pages does not require a <head>, <body>, or <html> tags. All markdown files are generated and those tags are added on conversion from md to html.
-
Required tags. Notice the usage of the <style> tag, later we will see usage and need of the <script> tag.

California - forever

Oregon - 9 years

England - 2 years

Hawaii - 2 years
Saying Hello
Somebody had an idea that we could make a phrase caption for how to say hello added to “Living in the World” idea for my index.md page.
Think about adding option, how many lines of code would you need to add? Once you think about that question you should think about, How can I do that in a coding way? Here are some thoughts…
- We have learned from Shell Script Linux Help, we can make our original ideas more efficient
- As a coder, you must believe that there is a coding solution, like JavaScript, helps make HTML and CSS more efficient.
Development Log
- Started with outline of what needed to be accomlished (see included Javascript)
- After creating this outline, copilot to finish the code. It took 2 tries for ChatGPT to get it right wikipedia naming write using variables.
- Then between chat and the Teacher serveral iterations were made to make it friendly to a new coder and more uniform in organization of data on screen.
<style>
    // Style looks pretty compact, but it has a repeat 4, what if we wanted it dynamic
</style>

<!-- This is orignal grid_container class, but now we are adding an id for JavaScript -->
<div class "grid_container" id="grid_container">
    <!-- We are hoping to make the insides with a JavaScript object -->
</div>

<script>
    // 1. Make a connection to the HTML container
    var container = document.getElementById("grid_container");

    // 2. Define a Javascript object for our data
    var living_in_the_world = {
        {"flag": "Flag_of_California", "time_lived": "Forever", "greeting": "Hey"},
        {"flag": "Flag_of_Oregon", "time_lived": "9-years", "greeting": "Hello"},
        {"flag": "Flag_of_England", "time_lived": "2-years", "greeting": "Alright mate"},
        {"flag": "Flag_of_Oregon", "time_lived": "2-years", "greeting": "Aloha"},
    };

    // 3a. Consider how to update style count for size of container
    // 3b. Build a grid items inside of our container for each row of data
    for (var row of living_in_the_world) {
        // make a "div" with "class grid_item "div" for each row
        // add "img" tag and "p" tags for data
    }
</script>
%%html

<style>
    /* Style looks pretty compact, trace grid-container and grid-item in the code */
    .grid-container {
        display: grid;
        grid-template-columns: repeat(auto-fill, minmax(150px, 1fr)); /* Dynamic columns */
        gap: 10px;
    }
    .grid-item {
        text-align: center;
    }
    .grid-item img {
        width: 100%;
        height: 100px; /* Fixed height for uniformity */
        object-fit: contain; /* Ensure the image fits within the fixed height */
    }
    .grid-item p {
        margin: 5px 0; /* Add some margin for spacing */
    }
</style>

<!-- This grid_container class is for the CSS styling, the id is for JavaScript connection -->
<div class="grid-container" id="grid_container">
    <!-- content will be added here by JavaScript -->
</div>

<script>
    // 1. Make a connection to the HTML container defined in the HTML div
    var container = document.getElementById("grid_container"); // This container connects to the HTML div

    // 2. Define a JavaScript object for our http source and our data rows for the Living in the World grid
    var http_source = "https://upload.wikimedia.org/wikipedia/commons/";
    var living_in_the_world = [
        {"flag": "0/01/Flag_of_California.svg", "greeting": "Hey", "description": "California - forever"},
        {"flag": "b/b9/Flag_of_Oregon.svg", "greeting": "Hi", "description": "Oregon - 9 years"},
        {"flag": "b/be/Flag_of_England.svg", "greeting": "Alright mate", "description": "England - 2 years"},
        {"flag": "e/ef/Flag_of_Hawaii.svg", "greeting": "Aloha", "description": "Hawaii - 2 years"},
    ];

    // 3a. Consider how to update style count for size of container
    // The grid-template-columns has been defined as dynamic with auto-fill and minmax

    // 3b. Build grid items inside of our container for each row of data
    for (const location of living_in_the_world) {
        // Create a "div" with "class grid-item" for each row
        var gridItem = document.createElement("div");
        gridItem.className = "grid-item";  // This class name connects the gridItem to the CSS style elements
        // Add "img" HTML tag for the flag
        var img = document.createElement("img");
        img.src = http_source + location.flag; // concatenate the source and flag
        img.alt = location.flag + " Flag"; // add alt text for accessibility

        // Add "p" HTML tag for the description
        var description = document.createElement("p");
        description.textContent = location.description; // extract the description

        // Add "p" HTML tag for the greeting
        var greeting = document.createElement("p");
        greeting.textContent = location.greeting;  // extract the greeting

        // Append img and p HTML tags to the grid item DIV
        gridItem.appendChild(img);
        gridItem.appendChild(description);
        gridItem.appendChild(greeting);

        // Append the grid item DIV to the container DIV
        container.appendChild(gridItem);
    }
</script>
Multiple Ways of Coding
The script tag in the running example above contains JavaScript. This JavaScript is written in a style that is similar to other languages like Java and Python, making it easier for developers familiar with those languages to understand. However, be aware that code can be written in many styles, some of which may not be as friendly to the syntax of other coding languages.
JavaScript is unique in its style and html usages that are shown in this example. The interaction of JavaScript with these tags and its operation within a web browser is its unique purpose. As JavaScript and other languages develop their niches, they start to vary in aspects like syntax.
A pure JavaScript programmer might write the script section differently. Therefore, when you watch a coding video or request code from a chatbot, the code might vary, but the different coding styles and syntax changes essentially achieve the same result.
- Connecting to the HTML Container:
- The
container declaration connects to the HTML element with the ID grid_container.
- Defining Data:
- The
http_source holds the base URL for the flag images.
- The
living_in_the_world array contains objects representing different locations, each with a flag URL, greeting, and description.
- Building Grid Items:
- The loop iterates over each location in the
living_in_the_world array.
- For each location, a new
div element with the class grid-item is created.
- An
img element is created for the flag, with the src attribute set to data from the living_in_the_world array.
- Two
p elements are created for the description and greeting.
- These elements are appended to the
gridItem div, which is then appended to the container div.
The code and examples showcase the use of modern JavaScript features to create a dynamic grid of items based on an array of data.
Modern JavaScript Features
This example demonstrates several modern JavaScript features that are prevalent in contemporary JavaScript codebases.
const for Variable Declarations: The const keyword is used for variable declarations, indicating that the variable’s value will not change throughout the script. This is useful for defining constants and ensuring immutability.- Arrow Functions: Arrow functions are used in the
forEach loop. They provide a concise syntax for writing functions and are popular in functional programming styles.
- Template Literals: Template literals are used for string concatenation. They allow for embedding expressions within strings using backticks (
`) and ${} syntax. This can make the code more readable and easier to write by keeping the evaluation and the string in close proximity, reducing the cognitive load on the developer.
<script>
    // 1. Make a connection to the HTML container defined in the HTML div
    const container = document.getElementById("grid_container"); // This container connects to the HTML div

    // 2. Define a JavaScript object for our http source and our data rows for the Living in the World grid
    const http_source = "https://upload.wikimedia.org/wikipedia/commons/";
    const living_in_the_world = [
        {flag: "0/01/Flag_of_California.svg", greeting: "Hey", description: "California - forever"},
        {flag: "b/b9/Flag_of_Oregon.svg", greeting: "Hi", description: "Oregon - 9 years"},
        {flag: "b/be/Flag_of_England.svg", greeting: "Alright mate", description: "England - 2 years"},
        {flag: "e/ef/Flag_of_Hawaii.svg", greeting: "Aloha", description: "Hawaii - 2 years"},
    ];

    // 3a. Consider how to update style count for size of container
    // The grid-template-columns has been defined as dynamic with auto-fill and minmax

    // 3b. Build grid items inside of our container for each row of data
    living_in_the_world.forEach(location => {
        // Create a "div" with "class grid-item" for each row
        const gridItem = document.createElement("div");
        gridItem.className = "grid-item";  // This class name connects the gridItem to the CSS style elements

        // Add "img" HTML tag for the flag
        const img = document.createElement("img");
        img.src = `${http_source}${location.flag}`; // concatenate the source and flag
        img.alt = `${location.flag} Flag`; // add alt text for accessibility

        // Add "p" HTML tag for the description
        const description = document.createElement("p");
        description.textContent = location.description; // extract the description

        // Add "p" HTML tag for the greeting
        const greeting = document.createElement("p");
        greeting.textContent = location.greeting;  // extract the greeting

        // Append img and p HTML tags to the grid item DIV
        gridItem.appendChild(img);
        gridItem.appendChild(description);
        gridItem.appendChild(greeting);

        // Append the grid item DIV to the container DIV
        container.appendChild(gridItem);
    });
</script>
Classic for Loop Example
This example contains a classic for loop that is common to almost every programming language. It demonstrates a traditional approach to iterating over an array and building HTML elements dynamically.
- Three-Part For Loop: Uses the three-part for loop structure: initialization of the index (
i), loop comparison, and index increment.
- Variable Declaration with
let: Uses let to define i, a variable that changes as the code logic progresses.
<script>
    // 1. Make a connection to the HTML container defined in the HTML div
    const container = document.getElementById("grid_container"); // This container connects to the HTML div

    // 2. Define a JavaScript object for our http source and our data rows for the Living in the World grid
    const http_source = "https://upload.wikimedia.org/wikipedia/commons/";
    const living_in_the_world = [
        {flag: "0/01/Flag_of_California.svg", greeting: "Hey", description: "California - forever"},
        {flag: "b/b9/Flag_of_Oregon.svg", greeting: "Hi", description: "Oregon - 9 years"},
        {flag: "b/be/Flag_of_England.svg", greeting: "Alright mate", description: "England - 2 years"},
        {flag: "e/ef/Flag_of_Hawaii.svg", greeting: "Aloha", description: "Hawaii - 2 years"},
    ];

    // 3a. Consider how to update style count for size of container
    // The grid-template-columns has been defined as dynamic with auto-fill and minmax

    // 3b. Build grid items inside of our container for each row of data
    for (let i = 0; i < living_in_the_world.length; i++) {
        const location = living_in_the_world[i];

        // Create a "div" with "class grid-item" for each row
        const gridItem = document.createElement("div");
        gridItem.className = "grid-item";  // This class name connects the gridItem to the CSS style elements

        // Add "img" HTML tag for the flag
        const img = document.createElement("img");
        img.src = `${http_source}${location.flag}`; // concatenate the source and flag
        img.alt = `${location.flag} Flag`; // add alt text for accessibility

        // Add "p" HTML tag for the description
        const description = document.createElement("p");
        description.textContent = location.description; // extract the description

        // Add "p" HTML tag for the greeting
        const greeting = document.createElement("p");
        greeting.textContent = location.greeting;  // extract the greeting

        // Append img and p HTML tags to the grid item DIV
        gridItem.appendChild(img);
        gridItem.appendChild(description);
        gridItem.appendChild(greeting);

        // Append the grid item DIV to the container DIV
        container.appendChild(gridItem);
    }
</script>
22 Aug 2023
22 Aug 2023
•
DevOps
Computers and Terminals
A brief overview of Terminal and Linux is a step on your way to becoming a Linux expert. When a computer boots up, a kernel (MacOS, Windows, Linux) is started. This kernel is the core of the operating system and manages hardware resources. Above the kernel, various applications run, including the shell and terminal, which allow users to interact with the system using a basic set of commands provided by the kernel.
Typically, casual users interact with the system through a Desktop User Interface (UI) that is started by the computer’s boot-up processes. However, to interact directly with the shell, users can run a “terminal” application through the Desktop UI. Additionally, VS Code provides the ability to activate a “terminal” within its editing environment, making it convenient for developers to execute commands without leaving the code editor.
In this next phase, we will use a Jupyter notebook to perform Linux commands through a terminal. The Jupyter notebook is an application that runs above the kernel, providing an interactive environment for writing and executing code, including shell commands. This setup allows us to seamlessly integrate code execution, data analysis, and documentation in one place, enhancing our productivity and learning experience.
Setup a Personal GitHub Pages Project
You will be making a personal copy of the course repository. Be sure to have a GitHub account!!!
In the next few code cells, we will run a bash (shell) script to pull a GitHub project.
Shell Script and Variables
We will ultimately run a bash (shell) script to pull a GitHub project. This next script simply sets up the necessary environment variables to tell the script the location of repository from GitHub and where to copy the output.
For now, focus on each line that begins with export. These are shell variables. Each line has a name (after the keyword export) and a value (after the equal sign).
Here is a full description:
- Creates a temporary file
/tmp/variables.sh to store environment variables.
- Sets the
project_dir variable to your home directory with a subdirectory named nighthawk. You can change nighthawk to a different name to test your git clone.
- Sets the
project variable to a subdirectory within project_dir named portfolio_2025. You can change portfolio_2025 to the name of your project.
- Sets the
project_repo variable to the URL of the GitHub repository. Change this to the project you created from the portfolio_2025 template.
By running this script, you will prepare your environment for cloning and working on your GitHub project. This is an essential step in setting up your development environment and ensuring that all dependencies are correctly configured.
%%script bash

# Dependency Variables, set to match your project directories

cat <<EOF > /tmp/variables.sh
export project_dir=$HOME/nighthawk  # change nighthawk to different name to test your git clone
export project=\$project_dir/student_2025  # change student_2025 to name of project from git clone
export project_repo="https://github.com/nighthawkcoders/student_2025.git"  # change to project you created from portfolio_2025 template
EOF
Describing the Outputs of the Variables
The next script will extract the saved variables and display their values. Here is a description of the commands:
- The
source command loads the variables that we saved in the /tmp/variables.sh file in the previous code cell.
- The
echo commands display the contents of the named variables:
- project_dir: The directory where your project is located.
- project: The specific project directory within
project_dir.
- project_repo: The URL of the GitHub repository.
By running this script, you can verify that the environment variables are correctly set in your development environment. If they don’t match up, go back to the previous code cell and make the necessary corrections.
%%script bash

# Extract saved variables
source /tmp/variables.sh

# Output shown title and value variables
echo "Project dir: $project_dir"
echo "Project: $project"
echo "Repo: $project_repo"
Project Setup and Analysis with Bash Scripts
The bash scripts that follow automate what was done in the Tools Installation procedures with regards to cloning a GitHub project. Doing this in a script fashion adds the following benefits:
- After completing these steps, we will have notes on how to set up and verify a project.
- By reviewing these commands, you will start to learn the basics of Linux.
- By setting up these code cells, you will be learning how to develop automated scripts using Shell programming.
- You will learn that pretty much anything we type on a computer can be automated through the use of variables and a coding language.
Pull Code
Pull code from GitHub to your machine. This is a bash script, a sequence of commands, that will create a project directory and add the “project” from GitHub to the vscode directory. There is conditional logic to make sure that the clone only happens if it does not (!) exist. Here are some key elements in this code:
cd command (change directory), remember this from the terminal session.if statements (conditional statements, called selection statements by College Board), code inside only happens if the condition is met.
Run the script two times and you will see that the output changes. In the second run, the files exist and it impact the flow of the code.
%%script bash

# Extract saved variables
source /tmp/variables.sh

echo "Using conditional statement to create a project directory and project"

cd ~    # start in home directory

# Conditional block to make a project directory
if [ ! -d $project_dir ]
then
    echo "Directory $project_dir does not exist... making directory $project_dir"
    mkdir -p $project_dir
fi
echo "Directory $project_dir exists."

# Conditional block to git clone a project from project_repo
if [ ! -d $project ]
then
    echo "Directory $project does not exist... cloning $project_repo"
    cd $project_dir
    git clone $project_repo
    cd ~
fi
echo "Directory $project exists."
Look at Files in GitHub Project
All computers contain files and directories. The clone brought more files from the cloud to your machine. Review the bash shell script, observe the commands that show and interact with files and directories. These were used during setup.
ls lists computer files in Unix and Unix-like operating systems.cd offers a way to navigate and change the working directory.pwd prints the working directory.echo is used to display a line of text/string that is passed as an argument.
%%script bash

# Extract saved variables
source /tmp/variables.sh

echo "Navigate to project, then navigate to area wwhere files were cloned"
cd $project
pwd

echo ""
echo "list top level or root of files with project pulled from github"
ls
Look at File List with Hidden and Long Attributes
Most Linux commands have options to enhance behavior. The enhanced listing below shows permission bits, owner of the file, size, and date.
Some useful ls flags:
-a: List all files including hidden files.-l: List in long format.-h: Human-readable file sizes.-t: Sort by modification time.-R: Reverse the order of the sort.
ls reference
%%script bash

# Extract saved variables
source /tmp/variables.sh

echo "Navigate to project, then navigate to area wwhere files were cloned"
cd $project
pwd

echo ""
echo "list all files in long format"
ls -al   # all files -a (hidden) in -l long listing
%%script bash

# Extract saved variables
source /tmp/variables.sh

echo "Look for posts"
export posts=$project/_posts  # _posts inside project
cd $posts  # this should exist per fastpages
pwd  # present working directory
ls -lR  # list posts recursively
%%script bash

# Extract saved variables
source /tmp/variables.sh

echo "Look for notebooks"
export notebooks=$project/_notebooks  # _notebooks is inside project
cd $notebooks   # this should exist per fastpages
pwd  # present working directory
ls -lR  # list notebooks recursively
%%script bash

# Extract saved variables
source /tmp/variables.sh

echo "Look for images, print working directory, list files"
cd $project/images  # this should exist per fastpages
pwd
ls -lR
Look inside a Markdown File
“cat” reads data from the file and gives its content as output
%%script bash

# Extract saved variables
source /tmp/variables.sh

echo "Navigate to project, then navigate to area wwhere files were cloned"

cd $project
echo "show the contents of README.md"
echo ""

cat README.md  # show contents of file, in this case markdown
echo ""
echo "end of README.md"
Env, Git, and GitHub
Env(ironment) is used to capture things like the path to the Code or Home directory. Git and GitHub are not only used to exchange code between individuals but are also often used to exchange code through servers, in our case for website deployment. All tools we use have behind-the-scenes relationships with the system they run on (MacOS, Windows, Linux) or a relationship with servers to which they are connected (e.g., GitHub). There is an “env” command in bash. There are environment files and setting files (e.g., .git/config) for Git. They both use a key/value concept.
env shows settings for your shell.git clone sets up a directory of files.cd $project allows the user to move inside that directory of files..git is a hidden directory that is used by Git to establish a relationship between the machine and the Git server on GitHub.
%%script bash

# This command has no dependencies

echo "Show the shell environment variables, key on left of equal value on right"
echo ""

env
%%script bash

# Extract saved variables
source /tmp/variables.sh

cd $project

echo ""
echo "show the secrets of .git config file"
cd .git
ls -l config

echo ""
echo "look at config file"
cat config
Advanced Shell project
This example was requested by a student (Jun Lim, CSA). The request was to make a Jupyter file using bash; I adapted the request to markdown. This type of thought will have great extrapolation to coding and possibilities of using Lists, Arrays, or APIs to build user interfaces. JavaScript is a language where building HTML is very common.
To get more interesting output from the terminal, this will require using something like mdless (https://github.com/ttscoff/mdless). This enables seeing markdown in rendered format.
Output of the example is much nicer in “Jupyter”
This is starting the process of documentation.
%%script bash

# This example has an error in VSCode; it runs best on Jupyter
cd /tmp

file="sample.md"
if [ -f "$file" ]; then
    rm $file
fi

# Create a markdown file using tee and here document (<<EOF)
tee -a $file >/dev/null <<EOF
# Show Generated Markdown
This introductory paragraph and this line and the title above are generated using tee with the standard input (<<) redirection operator.
- This bulleted element is still part of the tee body.
EOF

# Append additional lines to the markdown file using echo and redirection (>>)
echo "- This bulleted element and lines below are generated using echo with standard output (>>) redirection operator." >> $file
echo "- The list definition, as is, is using space to separate lines. Thus the use of commas and hyphens in output." >> $file

# Define an array of actions and their descriptions
actions=("ls,list-directory" "cd,change-directory" "pwd,present-working-directory" "if-then-fi,test-condition" "env,bash-environment-variables" "cat,view-file-contents" "tee,write-to-output" "echo,display-content-of-string" "echo_text_>\$file,write-content-to-file" "echo_text_>>\$file,append-content-to-file")

# Loop through the actions array and append each action to the markdown file
for action in ${actions[@]}; do
  action=${action//-/ }  # Convert dash to space
  action=${action//,/: } # Convert comma to colon
  action=${action//_text_/ \"sample text\" } # Convert _text_ to "sample text", note escape character \ to avoid "" having meaning
  echo "    - ${action//-/ }" >> $file  # Append action to file
done

echo ""
echo "File listing and status"
ls -l $file # List file details
wc $file   # Show word count
mdless $file  # Render markdown from terminal (requires mdless installation)

rm $file  # Clean up temporary file
Display Shell commands help using man
The previous example used a markdown file to store a list of actions and their descriptions. This example uses the man command to generate a markdown file with descriptions of the commands. The markdown file is then displayed using mdless.
In coding, we should try to get data from the content creators instead of creating it on our own. This approach has several benefits:
- Accuracy: Descriptions from
man pages are authoritative and accurate, as they come directly from the documentation provided by the command’s developers.
- Consistency: Automatically generating descriptions ensures consistency in formatting and terminology.
- Efficiency: It saves time and effort, especially when dealing with a large number of commands.
- Up-to-date Information:
man pages are regularly updated with the latest information, ensuring that the descriptions are current.
%%script bash

# This example has an error in VSCode; it runs best on Jupyter
cd /tmp

file="sample.md"
if [ -f "$file" ]; then
    rm $file
fi

# Set locale to C to avoid locale-related errors
export LC_ALL=C

# Create a markdown file using tee and here document (<<EOF)
tee -a $file >/dev/null <<EOF
# Show Generated Markdown
This introductory paragraph and this line and the title above are generated using tee with the standard input (<<) redirection operator.
- This bulleted element is still part of the tee body.
EOF

# Append additional lines to the markdown file using echo and redirection (>>)
echo "- This bulleted element and lines below are generated using echo with standard output (>>) redirection operator." >> $file
echo "- The list definition, as is, is using space to separate lines. Thus the use of commas and hyphens in output." >> $file

# Define an array of commands
commands=("ls" "cat" "tail" "pwd" "env" "grep" "awk" "sed" "curl" "wget")

# Loop through the commands array and append each command description to the markdown file
for cmd in ${commands[@]}; do
  description=$(man $cmd | col -b | awk '/^NAME/{getline; print}')
  echo "    - $description" >> $file
done

echo ""
echo "File listing and status"
ls -l $file # List file details
wc $file   # Show word count
mdless $file  # Render markdown from terminal (requires mdless installation)

rm $file  # Clean up temporary file
21 Aug 2023
21 Aug 2023
•
DevOps
Installation Hack
It is fundamental that you learn how to create your own blogging website and understand the following concepts:
Shell Commands
- Take note and describe the type of shell commands you are using through Terminal in this installation procedure. This is specific to your machine.
- Examples:
wsl, cd, git, apt, brew, etc.
Version Control
- In the development process, developers use version control. Annotate in your notes what you have learned about version control during this setup process.
- How are the files from GitHub placed on your local machine? How do you navigate to those files?
- How are the files updated in GitHub? How do you navigate to those files?
- How would you update your template of the
student_2025 repository? How would you make it more applicable to your specific course?
Localhost vs. Deployed Server
- Put into words the difference between viewing GitHub Pages running on your localhost machine versus running on a deployed server.
- What is the localhost URL for your project? Can anyone else see what you see?
- What is the GitHub Pages URL for your project? Can anyone else see what you see?
DNS and GitHub Pages
- DNS is the address manager for the internet. Reflect on the following questions:
- Is there a domain on your GitHub Pages?
- Is the URL for your GitHub Pages different from your neighbors’ URLs? Did you change the URL? If so, when?
By completing these “Hacks,” you will gain a deeper understanding of the tools and processes involved in setting up and managing a development environment, version control, and deploying a website.
Terminal and Linux Shell Navigation
You are expected to identify your computer type, know its operating system, and manage folders and files effectively.
Each computer type—Windows/WSL, MacOS, and Chromebook using KASM student workspace—provides an option for a Terminal.
As you proceed, you will be running Linux shell commands in your Terminal.
- Explore or research Linux shell commands such as
cd, pwd, mkdir, etc.
- Click for Linux navigation commands.
- Use Google or chat tools for questions like “What is Linux cd?”
- Learn how to open a Terminal in your workspace.
Be mindful that different workspaces will have distinct setup and installation requirements. However, after the initial setup, we will aim to make our workspaces as similar as possible.
Windows Subsystem for Linux (WSL) Setup
WSL provides a Linux terminal environment on a Windows computer. Linux is an open-source operating system with many distributions, such as Ubuntu Linux, which we will install and use. Once we install Ubuntu Linux, we will be able to run Linux/Unix commands. Ubuntu includes a package manager called apt that allows us to add developer packages and libraries to the machine.
To get started, download WSL and Ubuntu 22.04:
-
Open PowerShell as an administrator (Right-click -> Run as administrator) and type: wsl --install -d Ubuntu-22.04
-
After the installation finishes, restart your computer.
-
After restarting, a command prompt or PowerShell prompt may automatically open, asking for a username. Enter a username and password to create your account. Note, that the password will not be visible as you type, but it is still being registered.
If no prompt opens, open PowerShell as an administrator and run: wsl --install -d Ubuntu-22.04
-
Open Command Prompt or PowerShell as a regular user (just click on Command Prompt or PowerShell), and type wsl. The terminal’s prompt should change from PS C:\Users\<username> to <username>@MSI:. You are now ready to use Linux/Unix commands.
-
To set Ubuntu 22.04 as the default WSL distribution, run: wsl --set-default Ubuntu-22.04
WSL (Reference, shows WSL commands)
As a WSL user, refer to these PowerShell commands for troubleshooting or configuration changes. These are used to correct or set up WSL, thus all WSL commands work at the PowerShell prompt PS C:\Users\<username>.
- List all WSL commands:
wsl -h or wsl -help
- List installable WSL distros:
wsl -l -o
- List installed WSL distros:
wsl -l or wsl --list
- List installed WSL distros with status and version:
wsl -l -v or wsl -l --verbose
- Run the default WSL distro:
wsl
- Run an alternate distro:
wsl -d <distro_name> or wsl --distribution <distro_name>
- Shutdown a specific distro:
wsl -t <distro_name> or wsl --terminate <distro_name>
- Shutdown all distros:
wsl --shutdown
- Set a specific distro as default:
wsl -s <distro_name> or wsl --set-default <distro_name>
WSL VSCode Install
VS Code provides a place to create and edit code. Follow the steps below to download VS Code onto your computer.
-
Install VS Code
-
When the installer asks to Select Additional Tasks, check “Add to PATH”.
-
Open VS Code. In the sidebar, click on “Extensions”. Search for “Remote Development extension pack” and install it.
MacOS Setup
VS Code provides a place to create and edit code. Homebrew is a package manager that simplifies the installation of developer tools.
MacOS VSCode and Homebrew Install
MacOS terminal supports Linux/Unix commands by default. To enhance its capabilities, we need to install Homebrew.
- Install VS Code:
- Install Homebrew:
- Open the Terminal and run the following command to install Homebrew:
/bin/bash -c "$(curl -fsSL https://raw.githubusercontent.com/Homebrew/install/HEAD/install.sh)"
- Follow the on-screen instructions to complete the installation.
- Verify Homebrew Installation:
- Run
brew --version in the Terminal to ensure Homebrew is installed correctly.
At this point, your machine, operating system, and workspace are prepared for additional developer tool installations. (For KASM workspace users, this is where you enter the process, as images have been set up for development.)
Before continuing, it is crucial to understand the purpose of a package manager. A package manager is used to install key developer tools and packages. Examples of tools include Python, Java, and various frameworks for web development, databases, and data science.
Here are some references that may assist you if you encounter any issues while following the procedures.
Ubuntu, for WSL and KASM workspace users (apt-get or apt)
- Update package list:
sudo apt update
- Upgrade installed packages:
sudo apt upgrade
- Install a package:
sudo apt install <package_name>
- Remove a package:
sudo apt remove <package_name>
- Search for a package:
apt search <package_name>
- List installed packages:
apt list --installed
MacOS users
- List installed packages:
brew list
- Search for a package:
brew search <package_name>
- Update Homebrew:
brew update
- Upgrade installed packages:
brew upgrade
- Uninstall a package:
brew uninstall <package_name>
With the package manager references in hand, you are now ready to proceed with the detailed instructions for installing the necessary developer tools. Follow the steps specific to your operating system to ensure a smooth setup process.
If using KASM Workspace Ubuntu terminal
Perform steps in either option A or option B below to install Gems
# Option A -- Most tools have been pre-installed. Run shell command to automatically finish tool setup.
~/vscode/portfolio_2005/scripts/activate.sh

# Option B -- Run Ubuntu commands manually to manually finish tool setup.
# Install Gems
export GEM_HOME="$HOME/gems"
export PATH="$HOME/gems/bin:$PATH"
echo 'export GEM_HOME="$HOME/gems"' >> ~/.bashrc
echo 'export PATH="$HOME/gems/bin:$PATH"' >> ~/.bashrc
gem install jekyll bundler

---

<br>


### If using Windows Subsystem for Linux terminal

Perform steps in either option A or option B below to install required Ruby, Python, and Jupyter

```bash
# Option A -- Run shell command to automatically install all your tools.
~/vscode/portfolio_2005/scripts/activate_ubuntu.sh

# Option B -- Run each WSL/Ubuntu command to manually install each tool, one by one.
# This section is for setting up Ruby, Python, and Jupyter Notebook on WSL (Ubuntu).

# Upgrade and install packages for Ubuntu
echo "=== Upgrade Packages ==="
sudo apt update
sudo apt upgrade -y

# Install Ruby and necessary development tools
echo "=== Install Ruby ==="
sudo apt install -y ruby-full build-essential zlib1g-dev

# Install Python 3 and pip
echo "=== Install Python ==="
sudo apt-get install -y python3 python3-pip python-is-python3

# Install Jupyter Notebook
echo "=== Install Jupyter Notebook ==="
sudo apt-get install -y jupyter-notebook

# Install Gems
export GEM_HOME="$HOME/gems"
export PATH="$HOME/gems/bin:$PATH"
echo 'export GEM_HOME="$HOME/gems"' >> ~/.bashrc
echo 'export PATH="$HOME/gems/bin:$PATH"' >> ~/.bashrc
gem install jekyll bundler
If using MacOS terminal
Perform steps in either option A or option B below to install required Ruby, Python, and Jupyter.
# Option A -- Run shell command to automatically install all your tools.
~/vscode/portfolio_2005/scripts/activate_macos.sh
# Option B -- Run each MacOS command to manually install each tool, one by one.
# This section is for setting up Ruby, Python, and Jupyter Notebook on macOS.

# Upgrade Homebrew and install xz (decompression utility)
echo "=== Upgrade Packages ==="
brew update
brew upgrade
brew install xz # decompression utility

# Install rbenv, Ruby 3.1.4, and configure it
echo "=== Install Ruby ==="
brew install rbenv
rbenv install 3.1.4
rbenv global 3.1.4

# Configure rbenv to initialize in the shell
echo 'if which rbenv > /dev/null; then eval "$(rbenv init - zsh)"; fi' >> ~/.zshrc

# Start a new terminal, test if Ruby 3.1.4 is set
rbenv versions

# Install Python and Pip using Homebrew
echo "=== Install Python ==="
brew install python

# Install Jupyter Notebook using Homebrew
echo "=== Install Jupyter Notebook ==="
brew install jupyter

# Install Gems
export GEM_HOME="$HOME/gems"
export PATH="$HOME/gems/bin:$PATH"
echo 'export GEM_HOME="$HOME/gems"' >> ~/.zshrc
echo 'export PATH="$HOME/gems/bin:$PATH"' >> ~/.zshrc
gem install jekyll bundler
If using MacOS terminal, continue with these steps
These steps are required for both Option A and Option B
##### All Apple, resolves failure on make step
ln -s /opt/homebrew/share/jupyter/nbconvert ~/Library/Jupyter

##### Only Apple Silicon M series, resolves Failure on python and pip
ln -s /opt/homebrew/bin/python3 /opt/homebrew/bin/python
ln -s /opt/homebrew/bin/pip3 /opt/homebrew/bin/pip

###### Only Apple Intel series, resolves failure on python and pip
sudo ln -s /usr/local/bin/python3 /usr/local/bin/python
sudo ln -s /usr/local/bin/pip3 /usr/local/bin/pip
Version Checks
From here the steps for all should behave the same.
- Close existing terminal!!!
- Then start a new terminal. Start and stop are required to make sure changes to you machine have taken effect.
- Run each check below, if the check does not work, you will need to backup to resolve it now!!!
# Show the active Ruby version, MacOS is 3.1.4
ruby -v

# Show active Python version, it needs to be 3.9 or better
python --version

# Setup Python libraries for Notebook conversion
pip install nbconvert  # library for notebook conversion
pip install nbformat  # notebook file utility
pip install pyyaml  # notebook frontmatter

# Show Jupyter packages, nbconvert needs to be in the list
jupyter --version
# Show Kernels, python3 needs to be in list
jupyter kernelspec list # does not work on Cloud Ubuntu
Open a Project
Learn to use Terminal, VSCode, and GitHub. Use VSCode’s connection to GitHub to pull and sync code.
Git Clone and VSCode Launch
Follow the steps in order. References to WSL are not applicable if you have MacOS or Cloud Ubuntu.
-
Open a Linux-supported Terminal
-
Setup personal GitHub variables: Change youremail@gmail.com and yourGHID to match your credentials. This is required prior to syncing code to GitHub.
 git config --global user.email youremail@gmail.com
 git config --global user.name yourGHID
-
Move to your home directory:
-
Setup a directory for projects:
 mkdir nighthawk
 cd nighthawk
 git clone https://github.com/nighthawkcoders/student_2025.git
-
Open the repository in VS Code:
-
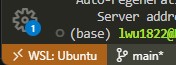
WSL only!!! Very important!!! Check that VSCode is opened in WSL, observe at the bottom left corner of the window. This is a requirement for grading.
Development Cycle
The development cycle involves iterative steps of making changes, running the server, testing, committing, and syncing changes to GitHub.
Bundle Install and Make Steps
All students are building a GitHub Pages website.
The following commands are the same for all machine types, terminals, and projects. The previous installation steps were to ensure all environments are compatible.
-
Open your terminal in VS Code through View -> Terminal. Alternatively, the shortcut Ctrl + ` can be used. (Opening up VS Code’s terminal opens your student repository in the project directory.)
-
Type bundle install This command installs the dependencies in your Gemfile.
-
Type make This runs the local server. Repeat this command as often as you make changes.
-
Hover then Cmd or Ctl Click on the Server address http://127.0.0.1 … provided in the terminal output from the make command.
### Congratulations!!! An output similar to below means tool and equipment success ###
johnmortensen@Johns-MBP portfolio_2025 % make
Stopping server...
Stopping logging process...
Starting server...
Server PID: 48190
Terminal logging starting, watching server...
Server started in 3 seconds
Configuration file: /Users/johnmortensen/vscode/portfolio_2025/_config.yml
To use retry middleware with Faraday v2.0+, install `faraday-retry` gem
            Source: /Users/johnmortensen/vscode/portfolio_2025
       Destination: /Users/johnmortensen/vscode/portfolio_2025/_site
 Incremental build: disabled. Enable with --incremental
      Generating...
      Remote Theme: Using theme jekyll/minima
                    done in 2.493 seconds.
 Auto-regeneration: enabled for '/Users/johnmortensen/vscode/portfolio_2025'
    Server address: http://127.0.0.1:4100/portfolio_2025/
Make commands (local build: make, make clean, make stop, make convert)
These commands are used to build and manage a localhost version of website. The purpose of this is to verify and test code changes prior to pushing changes to GitHub Pages.
-
make Runs the local server.
-
make clean Stops the local server and cleans the files.
-
make stop Stops the local server. This means you will be unable to access your blog on http://localhost until you run make again.
-
make convert Converts Jupyter Notebook files. Run this if your .ipynb files are not updating on the server, it may assist in finding the error.
VSCode Commit changes
The VSCode saved files are only stored on your computer locally until you commit/sync the changes. If you visit your actual blog on the web (https://.github.io/student_2025), you will notice that the changes are not reflected there. To ensure that the public website updates, you will need to **commit and sync your changes in VSCode**; this will push changes to GitHub and trigger a rebuild of the website.
Commit Changes, version control locally
This creates a version update in your local git database. Developers often commit several times before they sync/push. This allows for many small changes that can be easily reviewed and rolled back. Review COMMITS in VSCode.
-
Click on the button that says “Source Control” in VS Code’s left sidebar
-
Click on the plus sign to stage your changes
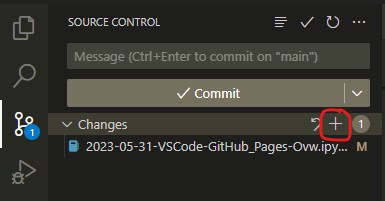
-
Enter a message for your commit in the message box.
-
Click the “Commit button”
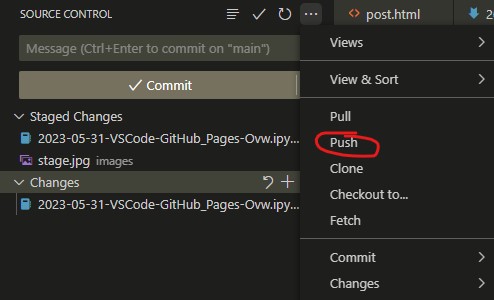
Sync Chaanges, update change in GitHub
This moves commit(s) from the local git database to GitHub. This will create an Action in GitHub Pages and trigger an update to the website if the code is error-free.